Thursday, 19 May 2011

Project 1

Story:

The toy that I have selected is Elekid! The yellow cute little pokemon! 
Elekid is always fond of racing, he likes to race in his yellow race kart, he has never lost a race before and so as soon as he heard about a race, he would definitely sign up for it!

Learning that there is a rat racing on a track with his mousetrap car, Elekid became so excited. He then took his yellow race kart and when on to the racing track facing his opponent the rat! 
The race begins..

 Shape:

Number of primitive parts: 6 (Hands, Legs and the head portion)
Technical aspects: (Almost everything that I've learnt, I will try to apply them all) E.g. Extrusion, bevelling, boolean, etc.


Design:


I guess this is how Wiremesh frame of my Elekid looks like? I have no experience in drawing wiremesh frames because I didn't learn it before. I guess this is the best that I could do! 
Will try to improve more if there was at least a tutorial on wiremesh drawing!

Tuesday, 17 May 2011

Week 4 Lab 1 (E-Learning)


Does multi-tasking give you a real or false sense of having accomplished something?

From my point of view, multi-tasking give me a false sense of having something accomplished. I’ve tried studying with my earpiece in my ears, blasting music. All that went into my head after an hour of study was the music. I could hardly remember anything that I studied. However, if I was studying with the music blasting from the speakers, I can remember the content of what I’m studying after an hour.


Is learning 3D and design different from learning programming, or is all the learning the same? Why?

Learning 3D and design and learning programming is two different things. Learning 3D requires you to think in 3D, thinking about all the designs and stuff. For programming, thinking of how to code works with each other is different from designing.
The learning progress of 3D and programming is the same, it requires us to practice and practice. We can’t memorize and then just pit it out during exams. Another example would be playing games. We can’t just play the game and expect us to be good at it. Practice makes perfect. However no one is perfect at doing anything.


The article states that “Learning is actually a very complex operation for an individual”. Do you agree with this? Do you feel that you approach your learning in the best way = if yes, how, and if no, how can you change your work style?

Yes, I agree with the article. 

My way of learning is not the best way, because I always procrastinate. Even if I don’t and I focus on doing my work, I can’t get good grades. I guess I’ve to keep trying and trying until I get better.


What are your thoughts about the last paragraph in the extract?

Law students not studying and playing freecell in class? I’m not really sure that they should even do that. If they can get into the law course by just playing freecell, why can’t we just play games in class and get into a game company to be a game designer or a programmer? 


Should your lecturers also focus on your work attitude, or just leave you to sink or swin on your own? Why?

Lecturers can make the lessons interesting to attract the student’s attention so that we can pay attention in class. If a particular student doesn’t wants to participate in class activities, then lecturers should not help him/her at all. Since he/she doesn’t want to learn anything. However, if a student is slow at work, or is lagging behind and the lecturers find out. He should consult the student to see if he needs help or not.

Sunday, 15 May 2011

Week 3 Lab 2 (Vase)

Process:
 Doing this vase was simple. All I did was just drawing the layout of the vase and used the revolving tool. After using that tool, this vase was formed. It looked weird at first, the base was a little too sharp so I edited it by just moving the vertex and scaling it. 

Reflection:
I just did a simple vase by just drawing it with create CV and by revolving it.
I'm sure it looks like a vase!

Week 3 Lab 2 (Bucket)

 First I started to created the bucket outline by using the JPEG file, after that I used the revolve tool to make the bucket shape.

 Now I used the Boolean tool to make the holes at both ends of the bucket.

 This is the connector, which I created using the same technique I used to create the bucket.

Before creating the handle, I used the drew the curve and later on extruded with around the curve to form the handle.

I stuck at the handle part, after figuring how to do it, my handle was messed up. Oh well, this is a unique bucket then! I have no idea how to scale it smaller, if I scaled it smaller, it shrinks instead..

After a lot of attempts, I managed to make my handle! I drew a smaller handle and extruded it, it looks so much better!

Finally I got the handle right, looks a bit weird though. 


Reflection
This is one of the worst exercise that I've done so far. Instructions given were unclear, took hours to understand them. However, I still enjoyed the process of making the bucket. At least I've learnt something new by modeling this bucket.

Week 3 Lab 2 (Washing Board)


Process:
Firstly, I created the base of the wash board by using the plane polygon. After doing so, I created the scrubbing area using the extruding function after selecting the edges of the board.

Secondly, I created the sides and the top part by just using the square polygon and scaling it to fit the board. Using the bevel tool to round the sides and my washing board is completed.

Reflections:

The washing board was the easiest out of all the exercise that were given in this week!
The only "hard" part was the middle part, which was the washing area. The scrubbing area I mean. Enjoyed doing this exercise! 

Wednesday, 11 May 2011

Week 3 Lab 2 (Track)

 
Process
Firstly, we drew the outline of the track using the CV tool. After drawing the outline of the track, we extruded it.

After extruding it, we extruded the joints for the track and later we beveled the sides to make it look like a joint. After doing so, we blend the tracks by using changing the values in the channel box. From 0 to 1, or 1 to 0.

Reflection

The tracks were quite easy to do. Instructions were quite clear, even though I had trouble with some parts. Making this track was certainly fun and I enjoyed doing it.

Sunday, 8 May 2011

Week 2 Lab 2 (Torned Cardboard)

Process:
I continued this cardboard from the previous exercise. I deleted 3 sides of the flaps and left it with 1 side.
I selected the flap and rotated it to make it look like its 45degrees. After that I made the other sides of the cardboard looks like it it torn by playing around with the vertex. Scaling it and moving it to make it unbalanced. After playing with it, I find the cardboard looks torn enough for me to post it in my blog. 

Reflection:
Tried to make it looks like it's a old and torn cardboard box is pretty hard. After a few tries I managed to somehow made it look like it's ripped off. This is the best that I could do! (:

Friday, 6 May 2011

Week 2 Lab 2 (Cardboard Model)

 I created a box with the measurements given.

 I made it look like a box that is empty now after extruding the top downwards.

Now I extruded the side of the box to make flaps for the cardboard box.

I open the top and the bottom side of the flaps so that the side flaps can be opened up.

 
Now the flaps are all opened and I also used the deform-er tool to make the box looks old
Reflection:
I had so much trouble trying to do this assignment as the instructions on the PDF file was so unclear and it created a lot of misunderstanding in terms of finding the tools for some of the functions. The PDF file was outdated and the instructions were so hard to figure out. Had to google the functions in Maya 2012 to solve the problem.

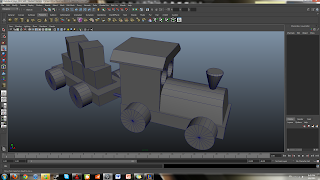
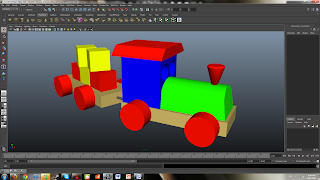
Week 2 Lab 1 (E-Learning Train + Gear)

Thanks to Ryan I know how to make the head of the train!
 
Process of making the train:
Firstly, before doing the train exercise we had to do the primitive shapes of the rectangle, triangle, cylinder, square and etc.. We learnt how to bevel the shapes and how to apply boolean on the polygons.

I started off making the base of the train, using the duplicate tool to duplicate the 2nd section of the train.

After doing that, I started to do the back of the train which is the part with the 5 cubes. I created a rectangle with is smaller than the base of the train and applied boolean to make a hole at the back of the train.

After completing the back, I head for the front of the train. I started off with the blue area, which requires us to use boolean to form the "eyes" and later on I made the top and the "nose" of the train which is in red.

Now, the train is almost done. the hardest part was the green one. I couldn't smooth the sides so I uploaded it without asking my friends. After asking them, I went to edit and now there is a smooth curve at the sides. I selected the vertex and used the move tool. As for the front of the train, I used boolean to make the slant.


Reflection:
This was a pretty simple E-learning work to do. At first I could do the head of the train until I got help from my classmate. I love shapes! 


 First I created the base of the gear, which can allow me to model into a gear.

 Selecting the face and extruding it

 Measure and scale and it's ready to be extruded!

 
 Completed!
Reflection:
It's a simple extruding and scaling exercise with just the use of the extrude tool.

Exploring Maya


Reflection
It was very easy to follow the video on how waves were being created. More of this videos should come out instead of PDF files, they were more helpful and we can easily understand what the video was trying to tell us.

Sunday, 1 May 2011

Lab 2 (Modified Robot)

 First I created a box
 Started to add more squares to make the body shape
 Adding a cylinder and then by scaling it to make it look like the robot's neck
 
Now I created a sphere to make the robot's head
...
..
.

After adding more spheres and more squares to my robot, my robot is now complete.
Most of the techniques used to created this robot is the rotate tool, scale tool, and the duplicate tool. Other then using these tools are just creating polygon shapes and scaling them to fit the robot.
 
 Front View
Back View 

 Modified Version (Front)

Modified Version (Back)
Name of robot: kiddOs
Description: kiddOs the swordman
Date of creation: 4/27/2011

kiddOs was created by Jimmy Neutron to protect his little brother Jimmy Neutrino.
Jimmy was always a fan of samurai ninjas, therefore, he tried to create a robot that can fight like a samurai.

kiddOs had a dream when he was created. It was to be the best swordman in the world.

This robot may not be armed with high tech weapons like guns or missiles, but his swordman skills are superb. With his jet pack for flying purpose, and the booster at the back. He is able to move at high speed, slashing invaders that enter the house.
kiddOs's chest is able to fire highly concentrated beams, small or big. The sword that he is holding is able to extend or shrink, making his combat at it's fullest. In small areas, his sword will change into a dagger, and his shield will become smaller. Making him able to fight.

This robot is also able to stealth to ambush the enemy by going into invisible mode.

However, this robot was only programmed to protect Jimmy and his brother. Jimmy has 5minutes left to re-program his robot if not their parents will be sliced into minced meat!

Reflection:
I couldn't think of the modified robot at first so I tried to play with his legs. After that, I thought of a swordman and decided to create a swordman instead of a robot with guns or rocket launchers.


Lab 2 (kiddOs's Companion)


kiddOs's Companion!

Reflection:
Thinking that kiddOs is already overpowered, by giving him a companion which has powers will certainly own anything. So I designed this "bug" like looking robot to help kiddOs scout for enemies! The speed of this "bug" is so fast that the enemy will have a problem destroying it.