Sunday, 15 May 2011

Week 3 Lab 2 (Bucket)

 First I started to created the bucket outline by using the JPEG file, after that I used the revolve tool to make the bucket shape.

 Now I used the Boolean tool to make the holes at both ends of the bucket.

 This is the connector, which I created using the same technique I used to create the bucket.

Before creating the handle, I used the drew the curve and later on extruded with around the curve to form the handle.

I stuck at the handle part, after figuring how to do it, my handle was messed up. Oh well, this is a unique bucket then! I have no idea how to scale it smaller, if I scaled it smaller, it shrinks instead..

After a lot of attempts, I managed to make my handle! I drew a smaller handle and extruded it, it looks so much better!

Finally I got the handle right, looks a bit weird though. 


Reflection
This is one of the worst exercise that I've done so far. Instructions given were unclear, took hours to understand them. However, I still enjoyed the process of making the bucket. At least I've learnt something new by modeling this bucket.

Week 3 Lab 2 (Washing Board)


Process:
Firstly, I created the base of the wash board by using the plane polygon. After doing so, I created the scrubbing area using the extruding function after selecting the edges of the board.

Secondly, I created the sides and the top part by just using the square polygon and scaling it to fit the board. Using the bevel tool to round the sides and my washing board is completed.

Reflections:

The washing board was the easiest out of all the exercise that were given in this week!
The only "hard" part was the middle part, which was the washing area. The scrubbing area I mean. Enjoyed doing this exercise! 

Wednesday, 11 May 2011

Week 3 Lab 2 (Track)

 
Process
Firstly, we drew the outline of the track using the CV tool. After drawing the outline of the track, we extruded it.

After extruding it, we extruded the joints for the track and later we beveled the sides to make it look like a joint. After doing so, we blend the tracks by using changing the values in the channel box. From 0 to 1, or 1 to 0.

Reflection

The tracks were quite easy to do. Instructions were quite clear, even though I had trouble with some parts. Making this track was certainly fun and I enjoyed doing it.

Sunday, 8 May 2011

Week 2 Lab 2 (Torned Cardboard)

Process:
I continued this cardboard from the previous exercise. I deleted 3 sides of the flaps and left it with 1 side.
I selected the flap and rotated it to make it look like its 45degrees. After that I made the other sides of the cardboard looks like it it torn by playing around with the vertex. Scaling it and moving it to make it unbalanced. After playing with it, I find the cardboard looks torn enough for me to post it in my blog. 

Reflection:
Tried to make it looks like it's a old and torn cardboard box is pretty hard. After a few tries I managed to somehow made it look like it's ripped off. This is the best that I could do! (:

Friday, 6 May 2011

Week 2 Lab 2 (Cardboard Model)

 I created a box with the measurements given.

 I made it look like a box that is empty now after extruding the top downwards.

Now I extruded the side of the box to make flaps for the cardboard box.

I open the top and the bottom side of the flaps so that the side flaps can be opened up.

 
Now the flaps are all opened and I also used the deform-er tool to make the box looks old
Reflection:
I had so much trouble trying to do this assignment as the instructions on the PDF file was so unclear and it created a lot of misunderstanding in terms of finding the tools for some of the functions. The PDF file was outdated and the instructions were so hard to figure out. Had to google the functions in Maya 2012 to solve the problem.

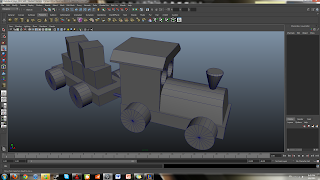
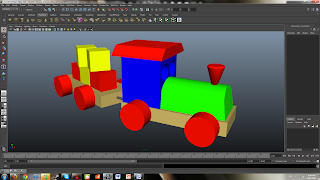
Week 2 Lab 1 (E-Learning Train + Gear)

Thanks to Ryan I know how to make the head of the train!
 
Process of making the train:
Firstly, before doing the train exercise we had to do the primitive shapes of the rectangle, triangle, cylinder, square and etc.. We learnt how to bevel the shapes and how to apply boolean on the polygons.

I started off making the base of the train, using the duplicate tool to duplicate the 2nd section of the train.

After doing that, I started to do the back of the train which is the part with the 5 cubes. I created a rectangle with is smaller than the base of the train and applied boolean to make a hole at the back of the train.

After completing the back, I head for the front of the train. I started off with the blue area, which requires us to use boolean to form the "eyes" and later on I made the top and the "nose" of the train which is in red.

Now, the train is almost done. the hardest part was the green one. I couldn't smooth the sides so I uploaded it without asking my friends. After asking them, I went to edit and now there is a smooth curve at the sides. I selected the vertex and used the move tool. As for the front of the train, I used boolean to make the slant.


Reflection:
This was a pretty simple E-learning work to do. At first I could do the head of the train until I got help from my classmate. I love shapes! 


 First I created the base of the gear, which can allow me to model into a gear.

 Selecting the face and extruding it

 Measure and scale and it's ready to be extruded!

 
 Completed!
Reflection:
It's a simple extruding and scaling exercise with just the use of the extrude tool.

Exploring Maya


Reflection
It was very easy to follow the video on how waves were being created. More of this videos should come out instead of PDF files, they were more helpful and we can easily understand what the video was trying to tell us.